Showing posts with label DIY and Crafts. Show all posts

Sunday, June 22, 2014

DIY Chalkboard Laptop Skin

I have been on the hunt for the perfect laptop skin, after spending hours upon hours on every site known to man and a few sketchy sites which probably shouldn’t be, I gave up, devastated with the idea my laptop will just have to suffer through the scratches and stickiness of the land of the college student back pack.

But never fret!

I simply seeped some tea and allowed my cranium to flow and

Voila!
Inspiration hit!

No longer will I be cursed with the trauma of a scratched laptop and the agony of having to carry a pen and notepad to scribble nuggets of knowledge.

But the best is yet to come!

I realized the problem I had with choosing a laptop skin is that I didn’t want to pay for an expensive custom skin (I do not use a standard size macbook) and be stuck with the same design for ages!

The answer my friend is contact paper…chalkboard contact paper.

 I have been obsessed with chalkboards for as long as I can remember and I was so excited to find this product on amazon that allows me to not only doodle in class, but also prevent scratches to my laptop on treks between classes!

For this project you will need:
Chalkboard contact paper (you can find here)
A ruler
Sharpie or other permanent marker
Scissors
Squeegee or old plastic card
And a laptop!

Begin by measuring your laptop

Then sketch your rectangle (or square if your laptop is funky) and cut it out

Next slowly peel back the edge to allow a little sticky to show and press firmly to your laptop

Slowly peel back more of the paper backing while smoothing the surface onto your laptop

Finish by using the plastic card to press out any air bubbles

In order to have a great chalkboard surface you must “season” the chalkboard paper by rubbing chalk all over it like I have done here:


Next erase and write whatever your heart desires!

I switch off between cute quotes and to do lists!

*NOTE chalkboard pens make the writing process much smoother and is less likely to come off while in a bag. Also the pens eliminate chalk dust!

Keep crafting as the earth spins!


Cheers

DIY Painted Bobby Pins

Hello my lovelies,

Today I am sharing with you the easiest craft tutorial ever. 
Like seriously…
Buuuut it’s also the perfect craft to send any lady children or boys with longer hair down the rabbit hole of the craft world

So grab the mini-humans and let’s get crafty!
To start you will need:

Black bobby pins
Cardstock
Nail polish
Badda-Bing that’s it!

Simply slide the cardstock through the bobby pins as seen here:


Next apply two coats of any nail polish and finish with a top coat:

Let your creativity run wild and always be snazzy!

Cheers!

Wednesday, November 13, 2013

Art Pages Tutorial and Inspiration F. Scott Fitzgerald

Hello my lovelies,
Today I want to share with you one of my absolute favorite hobbies of all time, 

Art Journalism

Now I never really got into journaling or keeping a diary before discovering the world of Slam Books, now I keep one for every year.

For those of you who don't know this amazing gift inspired by Mean Girls, (no one is insulted I promise) It is a way of scrapbooking where you aren't restricted to the size of the page or the thickness of the materials you use. Its a great way to use up old and extra supplies and create an entirely new medium to express yourself.

My favorite way to create art pages for a journal is to start with a plain piece of cardstock paper, destroy it, reinvent it, and doodle just a bit more. I then punch a few holes and throw it into a binder filled with pictures, stories, postcards, whatever I did that year that enlightened me and that I want to remember.

I created two pages recently inspired by two amazing quotes written by the one and only F. Scott Fitzgerald.

Fun Fact: the F. stands for Francis

Now to picture-explain this
Start with a few bits glued to your cardstock:
Here I started with a magazine picture, some construction paper, fabric scraps, printed paper, yarn, and a bit of spilled candle wax. I also added tea paper, black ink, and a bit of green sugar crystals (I was curious on what would happen)

The second page I added more fabric, tea paper, ink, sprinkles, and a cupcake liner.

This is the second page after adding some watercolor paint over the newly textured background
After the paint dried, I wrote this quote on the first page. 
And this one on the second page


The final pages!


I love the freedom art journaling has, it allows me to fully throw all I have to create a beautiful mess.


If you create any art pages let me know! Add them in the comments below and we can make an online community journal!

As always my dears, never forget the sun will always shine again tomorrow.

Cheers.


Don't forget to check out my links for my Etsy shop and Facebook and subscribe so you dont miss any Elfin madness!

Etsy: www.etsy.com/shop/ElfinAdventure
Facebook: www.facebook.com/elfinadventure

Monday, November 11, 2013

Blurring the Lines Between Indoors and Out"-Indoor Gardening Series #4 Painted Pots

Good Evening,
my darling tea sippers,
Today I bring you the final blog in my indoor gardening DIY series:
Painted Pots

Have you ever just glanced over at your gardening space, loved the luscious green foliage but hated the bland pots in comparison?

Well today is perfect for you!

I bring to you a few fun and whimsical pot inspiration with a few tips to replicate my designs!

The first one requires little skill level as it is just a few painting techniques
This "cottage chic"design is achieved by first sealing your terracotta pot in order to keep water in and paint chemicals out.
Next, spray on a nice crackle medium *I only applied this under the rim 
Secondly, Paint on your color of choice (mine being a bright blue)
Finally, seal with a matte spray and you're finished!

*Please let dry before trying to plant anything

The next design requires slightly more painting ability (equivalent to a three year old, you got this)
If you couldn't tell, I was inspired both by the Super Mario mushrooms, and also by the cute, legendary German mushrooms said to bring good luck and happiness similar to Garden Gnomes

This design was painted on a much smaller pot and one made of plastic so a sealer was unneeded.
For this I simply used acrylic craft paint and painted the top half red and the bottom half white. 
I then used my finger to dab little spots to create the polka-dot effect. 
Finish with a sealer and you are a rock star ready to grow a few inches (of plants that is, please do not eat this pot)

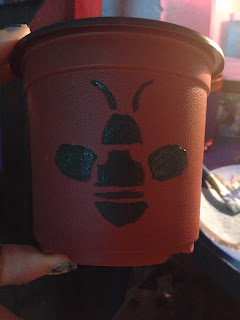
The next design was super simple to create. You could either freehand the design (as I did) or create a freezer paper stencil.

I was inspired by the Honeybee Journals (available in my shop!)and decided to create this adorable bee.

I simply sketched the design using a pencil, filled it in with acrylic paint, and sealed it!

This last pot is intended for those with tons of extra free time and a skilled artistic hand.
To start this design, I found a picture of a Sugar Skull I liked, and sealed the terracotta pot.
Next, using a pencil, I sketched out the shape of the skull and any other outside swirls I felt in my heart to add.
Then, I sketched in areas for the eyes, nose, and mouth.
Next, I added smaller details such as teeth and ivy branches.
After choosing a great contrasting color and super tiny paintbrush, I painted over my pencil sketch to reveal the pot above!
Seal before outside use and this pot is ready for any Dia De Los Muertos Celebrations!

If you create any awesome pot designs share them below to inspire other readers!

As always, never forget to whisper secrets to your plants.
Cheers.

Check out my links above for my shop and facebook!

Saturday, October 12, 2013

Blurring the Lines Between Indoors and Out Indoor Gardening Series #3 Plant Markers

Blurring the Lines Between Indoors and Out Indoor Gardening Series #3
Plant Markers

Such a lovely day it has been, enjoying nature, finding the perfect fallen twigs for today’s project:


These adorable plant markers can be placed upright in the soil or just near the plants you wish to identify

*NOTE: When selecting the perfect little twigs, do not under any circumstances steal food from a beaver or a walking cane from the friendly garden gnomes

To get started on this quick little gem we shall begin by finding a few fallen twigs:

I like to select twigs about a half inch in diameter and 8-9 inches long.

Next, using a knife, remove a small area of bark to be used as the writing surface, if you would like, sand this area smooth.

Finally, whittle down the tip of the plant marker (opposite end of the writing surface) to a dull point to allow for easier insertion into your pots or garden plot.  

And very much so lastly, write the name of the plant on the marker, place, and enjoy!

I love bringing more bits of nature into my indoor garden to really make it feel homey to my little seedlings. If you would like to see any specific tutorials please comment below and I will do my best to create one for you!

As always, keep your tea seeped, and a smile upon your face.

Cheers.

Blurring the Lines Between Indoors and Out Indoor Gardening Series #2 Miniature Greenhouses

Blurring the Lines Between Indoors and Out Indoor Gardening Series #2
Mini Greenhouses
Good Morning all the lovely world! Today we will be continuing our indoor gardening series by bringing you a cute, fun, mini project to complete to finish off your lovely recycled seed starter pots.
These miniature greenhouses take less than one minute to create and will leave your little seedlings all cozy and warm!

To begin, find a clear water bottle:


Then measure the height of the pot you wish to warm:


And simply cut the bottle bottom (ha) to the right length, place over your baby seed pot and place in a sunny location!


This project continues to bring recycled elements into the garden enjoy!

Cheers. 

Wednesday, August 21, 2013

“Blurring the Lines Between Indoors and Out” Indoor Gardening Series Recycled Seed Starter Pots

Good Morning!

Today marks the beginning of a lovely green series all about indoor gardening! I shall call it:

“Blurring the Lines Between Indoors and Out”

And thanks to the fantastic P. Allen Smith this ravishing phrase has become quite catchy and a tad overused but nonetheless ideal.
As few (if any) of you know I have quite the dainty indoor garden in my bedroom (NOTE* recommended to have a large sunny space as plants take up room and smell slightly dirty thanks to the potting soil) To start my humble gnome home I selected a room with a big window that faces primarily south/southwest in order to harvest all the sunlight I can. I then selected seeds that will work well indoors. I chose Marigolds (yummy tea!) Cucumbers (hardy indoors or out but needs a trellis) Green Bell Peppers (Favorite snack!) and Sunflowers.

Yes, Sunflowers can be grown indoors with high ceilings and plenty of light (No, my parents do not know about this one :] )

To start my lovely seeds I wanted to find an eco-friendly, recyclable, yet decomposable seed starter and after many hours of internet searching I found the perfect one!

To make these cute little guys, I began collecting many toilet paper rolls. I then pre-creased each edge of the bottom of the tube to make it easier to form the pot-like bottom

I then pinched in opposite sides and folded them down to create half the bottom


I repeated the process with the last two remaining “points” to form the base of the pot (this part can be a tad tricky)


 *If your pot doesn’t stand well try placing a small cylinder item inside, setting it on a hard surface, and pressing the flaps flat.

I then filled each little pot 7/8 (fancy measuring skills there *guestimate) full with an organic seed starting medium. I placed a tiny little seed in the middle and filled the pot the rest of the way full with seed starting medium. Place your little dandies on a plastic tray (water and soil may leak out the bottom) in a sunny location (bright window sill or shelf with a grow light) and be patient. Be sure to water frequently and of course introduce yourself to the cute little seeds.


After the little buds are a few inches tall, you are ready to pop them into their permanent home and treasure your new roommates!

Saturday, August 10, 2013

21 Signs You Sew Too Much

21 Signs That You Sew Too Much
1.  You own 3 pairs of scissors
2. “fabric Stash” is an underestimate
  3.You know your body’s measurements by heart
4. “Sew only September” is on your bucket list
5.You no longer feel pain after sticking your finger with a pin or needle
6.The seam ripper is your best friend
7.You go to a clothing store and think “I could make that”
8.  Whenever you hear “Make it work” you automatically picture Tim Gunn
9.  You will frequently disappear for hours and have nothing to show for it because you couldn’t “make it work”
10.  You will stab someone for using you fabric scissors for anything but fabric 
111. “Where did you buy that?” Is the world’s best compliment
12. Joanne’s is preprogrammed into your GPS (Like you actually need it)
13. You can perfectly eyeball an 1/8”
14.   You go hours with a measuring tape around your neck forgetting it’s there
15.   You own more than 2 pincushions
16.   You know what different fabrics are based on their feel
17.   You own more throw pillows than you know what to do with
18.   You know the differences between a Baste stitch and a Topstitch
19.   Your sewing machine has a name
20.   Be honest, you haven’t measured a hem since your first circle skirt

21.   “Hi Lo” Is an excuse for not measuring the hem…

Sunday, July 28, 2013

Ribbon-Tied Wrap Bracelet Tutorial

Ribbon-Tied Wrap Bracelet Tutorial
07/28/2013
Hello people of the internet! Today on this lovely Sunday, I will be sharing one of my favorite DIY accessories (okay complete lie I have too many to pick a favorite, besides no one wants a jealous riot of DIY accessories on their hands eek!)

Anywho here is a preview of what we shall be making!

 Cute right? and could totally cover up a wrist tattoo for the “professional” work place.


SO let’s get started!


Step 1: Gather Materials
 For this project you will most definitely need the following (unless you’re super                  creative or changing it up a bit in which case: KUDOS! Please share your version                below!)
          Base Fabric
          Decorative Fabric
          Sharpie or Fabric Pen
          Ribbon
Needle and Thread or Sewing Machine
          Scissors, Ruler, Chalk, Pins, Etc


Step 11: Cut Those Pieces!
To begin I cut 2 pieces of my base fabric (greyish black) in a rectangle measuring 3” by 6” Then I selected a pink fabric (loved the abundance of exposed fray) and a thick white fabric for the word. I cut a random triangle of the pink and a small word-sized piece of the white. Then with a Sharpie or Fabric Pen I wrote the word “fearless” on the white fabric piece. For the ribbon, I cut 12" then cut that in half to form two 6" or just enough to tie a bow since the fabric cuff wraps all the way around the wrist.


Step 111: Pin it up!
I arranged my fabric pieces in a visually appealing way and pinned them in place to the top fabric ONLY!
I didn’t bother with tucking under the edges because I loved the frayed look but do as you please.          


Step 1V: Sew that mess!


I sewed (sewn?) all around the edges of the piece fabric (kind of goes without saying)


Step 5: Attach the better half!
Then (just as you were making a pillow or any other two-layer item pin the edges RIGHT SIDES FACING IN!!! and stich all around being sure to leave a space for turning it right side out (after all we did spend time making the front pretty).
 For attaching the ribbon pin it to the edge of each side with the pieces inside before sewing the edges (because that made sense)


Ribbon Sandwich!


Step V1: Turn the thing around! (Sounds better if you sing it!)
         
Turn the entire bracelet inside out and topstich the opening closed.


THEN…
SHOW OFF YOUR RAD SELF!

                                        
If you have any questions please ask them below, also share your versions! 
And as a lasting thought to contemplate over a steaming mug of Chai...Gandhi once said "We must be the change we wish to see in the world." My question for you is, what do you see?
Cheers. 

P.S. Comment below if you would like me to add finished bracelets to the Elfin Adventure Etsy Shop (Grand Opening Soon!!)